Why pride cake?
Yes, this is essentially a rainbow cake. There are no shortage of rainbow cakes recipes online but this one came about because a friend commissioned a pride cake for SF pride and I was honored to try to use my limited baking skills to fulfill her request. I had already delicious components in mind from other bakes in the past so this mainly became a challenge of construction and balancing flavors across components.
The end result was a hit at a pride party and I made a secondary cake with extra materials that I brought into the office to celebrate pride. Friend paid for the ingredients, I donated the time, and everybody was happy! 🏳️🌈
Why are there so many words?
TL;DR I want to give you all the information I have about this cake.
This post is meant to be just about comprehensive enough so that no significant baking intuition is required to exactly duplicate it and, to some extent, understand the reasoning behind the decisions I made to arrive at this recipe. This should perhaps not be the first cake you ever bake but with some careful reading and preparation this could perhaps be the second.
Overview
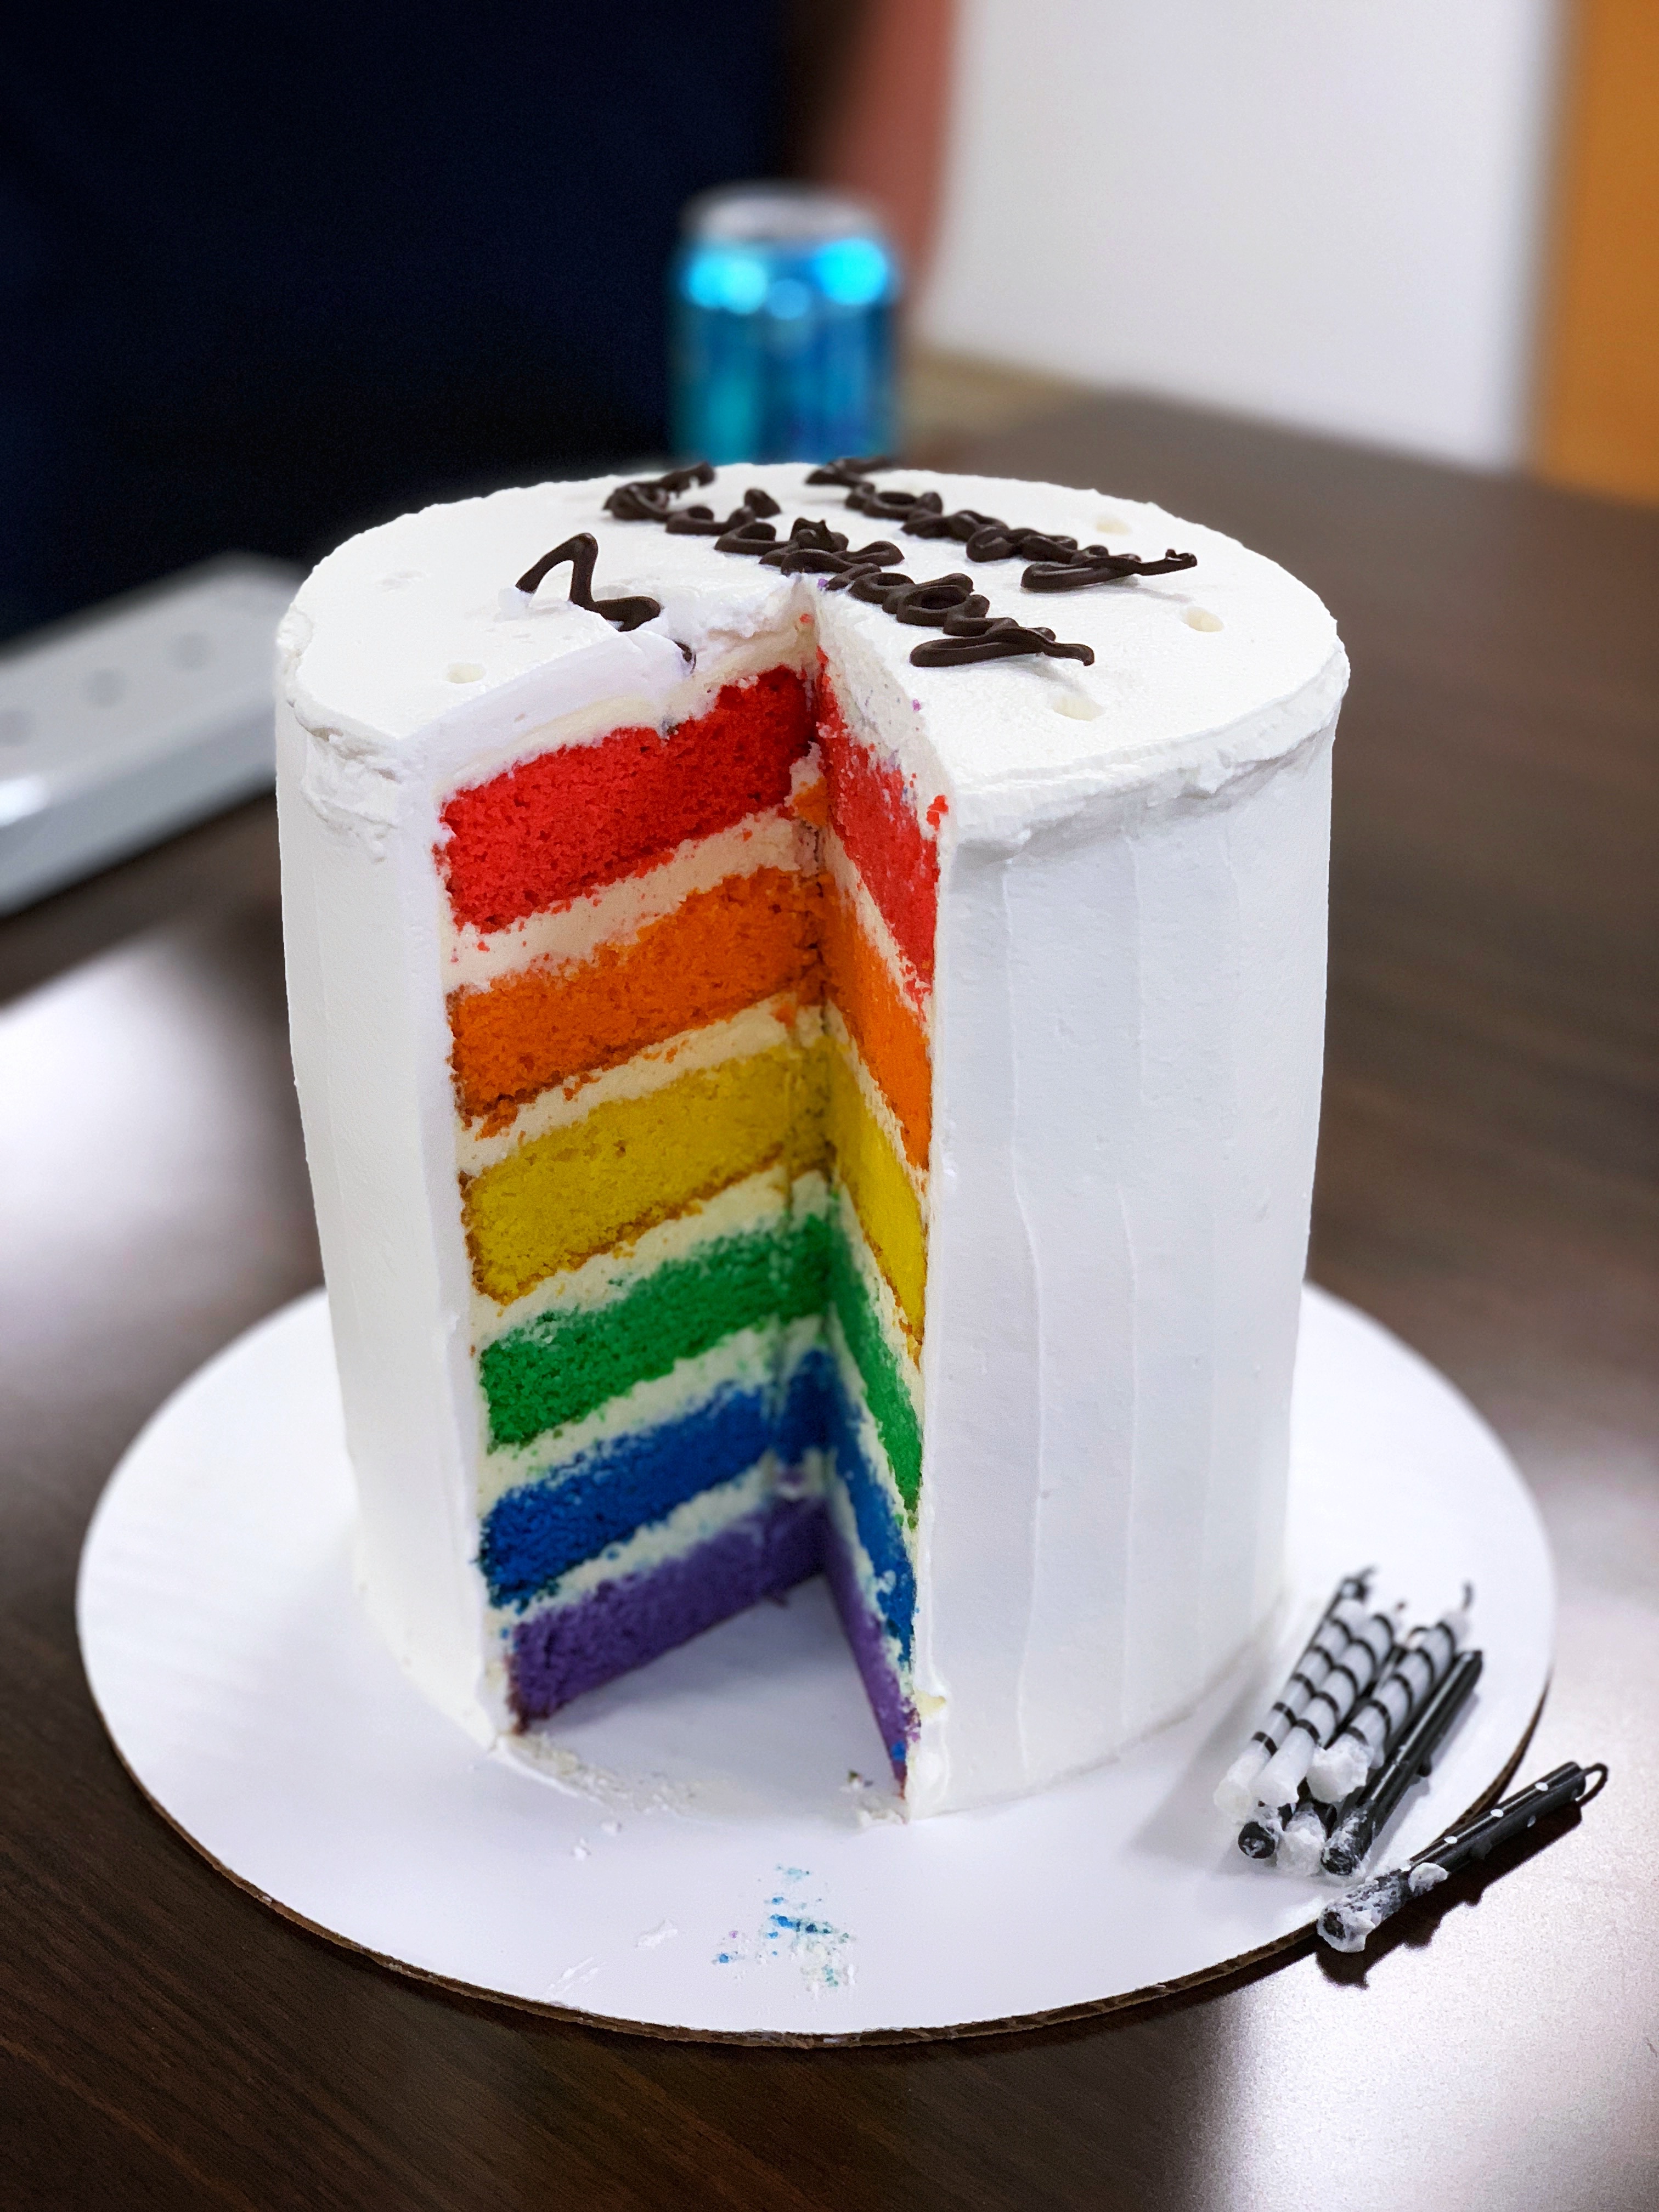
6″ extra tall boi
Rainbow cakes tend to focus on visual presentation but this pride cake eschews complex visual flourishes and instead focuses on two simple flavors that pair really well together: almonds and kirsch. The two flavors are spread across 3 relatively simple components: an almond sponge cake, a kirsch butter cream, and a kirsch frosting.
If you spend enough time watching Masterchef Australia, however, you’ll know that simplicity means there’s not a lot of places to hide mistakes and everything has to have BAGS of FLAVOR. So each component requires some special care.
- The almond sponge recipe is practically foolproof but make sure it’s leveled well so that when cut, each layer is the same height and perfectly horizontal.
- The buttercream is a Viennese buttercream I adapted (read: stole) from a recipe for Esterházy Schnitten from Rick Rodgers‘s book about Viennese cafés called, appropriately, Kaffeehaus (try to get the 2002 edition used, if you can; the print quality is much higher). It blends a creme patissiere with whipped butter for an extremely smooth butter cream that has a pleasant weight but isn’t overly stiff or dense.
- Ok there’s not much to the frosting, just a lot of good kirsch. It’s a great alternative to the standard vanilla frosting and extends the kirsch flavor of the buttercream to the outside layer of the cake while offering some contrast in texture.
None of this is particularly complex but it does take some time. Beginning to end, working at a relaxed pace with plenty of breaks to watch scenes from Mad Max: Fury Road, it can be a fun 4 hour activity. Fewer movie breaks and a careful hand with decoration should give you a cake in 3 hours without feeling too rushed. Anything around the 2 hour mark will be more difficult, a little less fun, but probably worthy of somebody WITNESSing you.
For the most relaxed results, making the sponge separately from the butter cream and frosting means you don’t have to carve out hours to bake on a single day. The sponge keeps in the fridge fine and in fact is much easier to work with once chilled. Which means more time for Mad Max: Fury Road.
On to the cake!
Ingredients
Use the best ingredients you can but the main ingredient where the quality matters dramatically is the kirsch. I use and highly recommend Schladerer, who produces their Kirschwasser with cherries from the famed Black Forest. It’s fantastic and produces perhaps the GOAT whipped cream frosting flavor.
Almond Sponge
Each batch of ingredients yields 3 sponges so you will need 2x of everything below.
- 350g soft butter
- 350g caster sugar
- 280g self raising flour
- 100g almond flour
- 1 tsp baking powder
- 5 large eggs at room temperature
- 1 tsp vanilla extract
- 1/2 tsp almond extract
You will also need food coloring. Here are you options:
- Natural food coloring – You can spend $200 and you won’t get good color. In this case, natural organic free range low sodium food coloring just won’t cut it. I paid like $10 for a pack and it barely did anything. Was it my own fault that I went to Whole Foods to get it? Yes. But now that I know better am I still bitter? Also yes.
- Normal liquid food coloring – This will work but a pack is still going to be more than $50 and you’ll need something like around 80 drops for each color before the cake is vibrant. Will do in a pinch. Well, 80 pinches.
- Gel food coloring – This is The One. Given the base yellow color of the batter, you need the big guns (lots of guns). Plus, you can buy a cost effective Rainbow Food Coloring Kit to save yourself the work of mixing colors. Just believe.
Kirsch Buttercream
- 2 Cups Milk, split into 1/2 cups and 1 1/2 cups
- 4 tbsp corn starch
- 1 1/3 cup sugar
- 4 large egg yolks
- 2 cups (4 sticks, 1 pound) butter at 65F
- 4 tablespoons kirsch
Kirsch Frosting
- 550ml heavy whipping cream, chilled
- 6 tbsp powdered sugar
- 6-8 tbsp kirsch
Equipment
There’s no specialty equipment required but having plenty of mixing bowls, spatulas, and parchment rounds will make things easier. The equipment below is recommended for best results but are not strictly required outside of an oven.
- Stand Mixer
- Kitchen Scale
- Infrared thermometer
- Cake Leveler
- Three 8″ round cake pans, with six 8″ parchment rounds
- Offset spatula, cake decorating turn table, a 10″ cardboard cake round (or a similar sized flat plate)
- A medium sauce pan
- A big bowl (or sink) with plenty of ice water for an ice bath
Components
Almond Sponge
- Preheat oven to 360F. Line three 8″ cake pans with parchment on the bottom.
- Optionally, grease the bottom of the pans before you put in the parchment. It’s not necessary but adhering the parchment to the pan makes spreading the batter a little bit easier down the line.
- Mix all the ingredients together in a stand mixer until fully combined. It actually helps to have the butter slightly cool so that you’ll have a bit of extra time to work with coloring the batter.
- Divide the cake into 3 separate mixing bowls. You should have approximately 1400g of batter so aim for around 450g of batter in each bowl.
- For each mixing bowl, add around 15 drops of gel coloring and mix well. You want a bright color but you’ll get diminishing returns as you add more and more coloring. Spoon the batter into one of the pans and do your best to smooth out the top and make sure the batter fills in the edges.
- Try to work fast as possible here as you don’t want the butter in the batter to melt too much.
- Bake for around 25 minutes or until a toothpick stuck into the center of the cake comes out clean. The cake will dome a little and the full height of the cake should be around 2/3-3/4″.
- Remove the pans from the oven and let cool for 10 minutes before flipping the cake out on to a cooling rack to cool completely.
- Once cooled, use a cake leveler to trim the cake to about 1/2″ tall and remove the parchment paper.
- The scraps left over from leveling make a pretty tasty baker’s snack. Just serve with a little bit of sweetened whip cream. Or use them for decoration (see construction below).
- Repeat all steps to make 3 more cakes to fill in the other 3 colors.
If you want to take a break, now is the time to do it! Wrap each sponge up in plastic wrap (or keep them in multiple airtight containers if you have them) and they’ll keep in the fridge overnight and actually be slightly easier to handle the next day. It may be tempting to stack all 6 together to save space but the weight can compress the lower layers so better to do 3 + 3. If you must stack all 6 together, try to stack them in inverse order of what you will serve. I layer red, orange, yellow etc. from top to bottom so when chilling I put the red layer at the bottom then, orange, and so on. This will equalize the pressure a bit so that the layer that will be most compressed eventually at the bottom (the purple) has the most opportunity to be less compressed while chilling.
Kirsch Buttercream
- In a medium sauce pan, combine the corn starch and 1/2 cup of milk and whisk until the corn starch is dissolved.
- Add the eggs and sugar and whisk until the sugar is fully dissolved. Whisk in remaining 1 1/2 cup of milk.
- While continually whisking, heat the milk mixture over medium heat until it is boiling, or right around 200F. Once it is bowling, scrape out mixture into a container surrounded by ice water. You’ve made a creme patissiere!
- The mixture will noticeably thicken right around 185-190F. It should boil soon after that.
- This step can be sped up if you’re adventurous and vigilant. Whisk quickly over high heat until the mixture is about 170F and then reduce to medium heat.
- Make sure the ice water does not come too high up the sides of the mixing bowl as when you press down the water may overflow into the mixing bowl.
- Stir the creme patissiere periodically to help it cool. You want the mixture to be uniformly below 70F in the end.
- While the creme patissiere is cooling, whip butter in a stand mixer until it is light and fluffy. You want the butter at around 65F.
- I tend not to pre-warm my butter from the fridge. I just cut it up at the beginning of everything and then whisk it in the stand mixer for about a minute or two on high. The friction will bring it up to just about the right temperature (about 60F+) and then letting it sit while I do the rest. If you use this method, make sure you slowly ramp up the speed on the mixer or the butter may just fly out of your bowl!
- Incorporate the creme patissiere into the butter one dollop at a time. Add a dollop, mix on medium speed, repeat. The exact amount doesn’t matter but no more than what a normal spatula can transfer without making a huge mess. Around 2 tablespoons or so. Fully incorporate each dollop of creme patissiere before moving on to the next one. Periodically scrape down the sides of the mixing bowl to get everything incorporated.
- As you incorporate the creme patissiere, check the temperature periodically to make sure the entirely mixture is around 68F or so. If it’s too cold it will be grainy (just mix on high speed until the butter cream warms up to 68-70 or so) and if it’s too hot (above 75) it can split and not worth it to rescue.
- Finally, add the kirsch, one tablespoon at a time, fully incorporating before the next tablespoon. Don’t be afraid to do medium to high speed bursts to incorporate the kirsch; you don’t want the alcohol to just sit around in one place wreaking havoc.
- Be aware that 8 tablespoons of kirsch is about the max the buttercream can hold before the alcohol starts to overwhelm the structure of the buttercream. 6 is safer and 4 is what would be used normally but I prefer a more kirsch forward flavor.
- When the buttercream is done it should be right around 70F, which is easy to spread but still not too runny. Use this right away. You should end up with around 1300g of buttercream.
Kirsch Frosting
- Pour heavy whipping cream into the bowl of a standing mixer fitted with the whisk attachment. Whisk on medium high until medium-stiff peaks form.
- Incorporate the powdered sugar one tablespoon at a time until uniform.
- Incorporate the kirsch one tablespoon at a time until uniform. At this point, the frosting should form stiff peaks and be ready to spread. Use immediately or keep cool in the refrigerator.
Construction
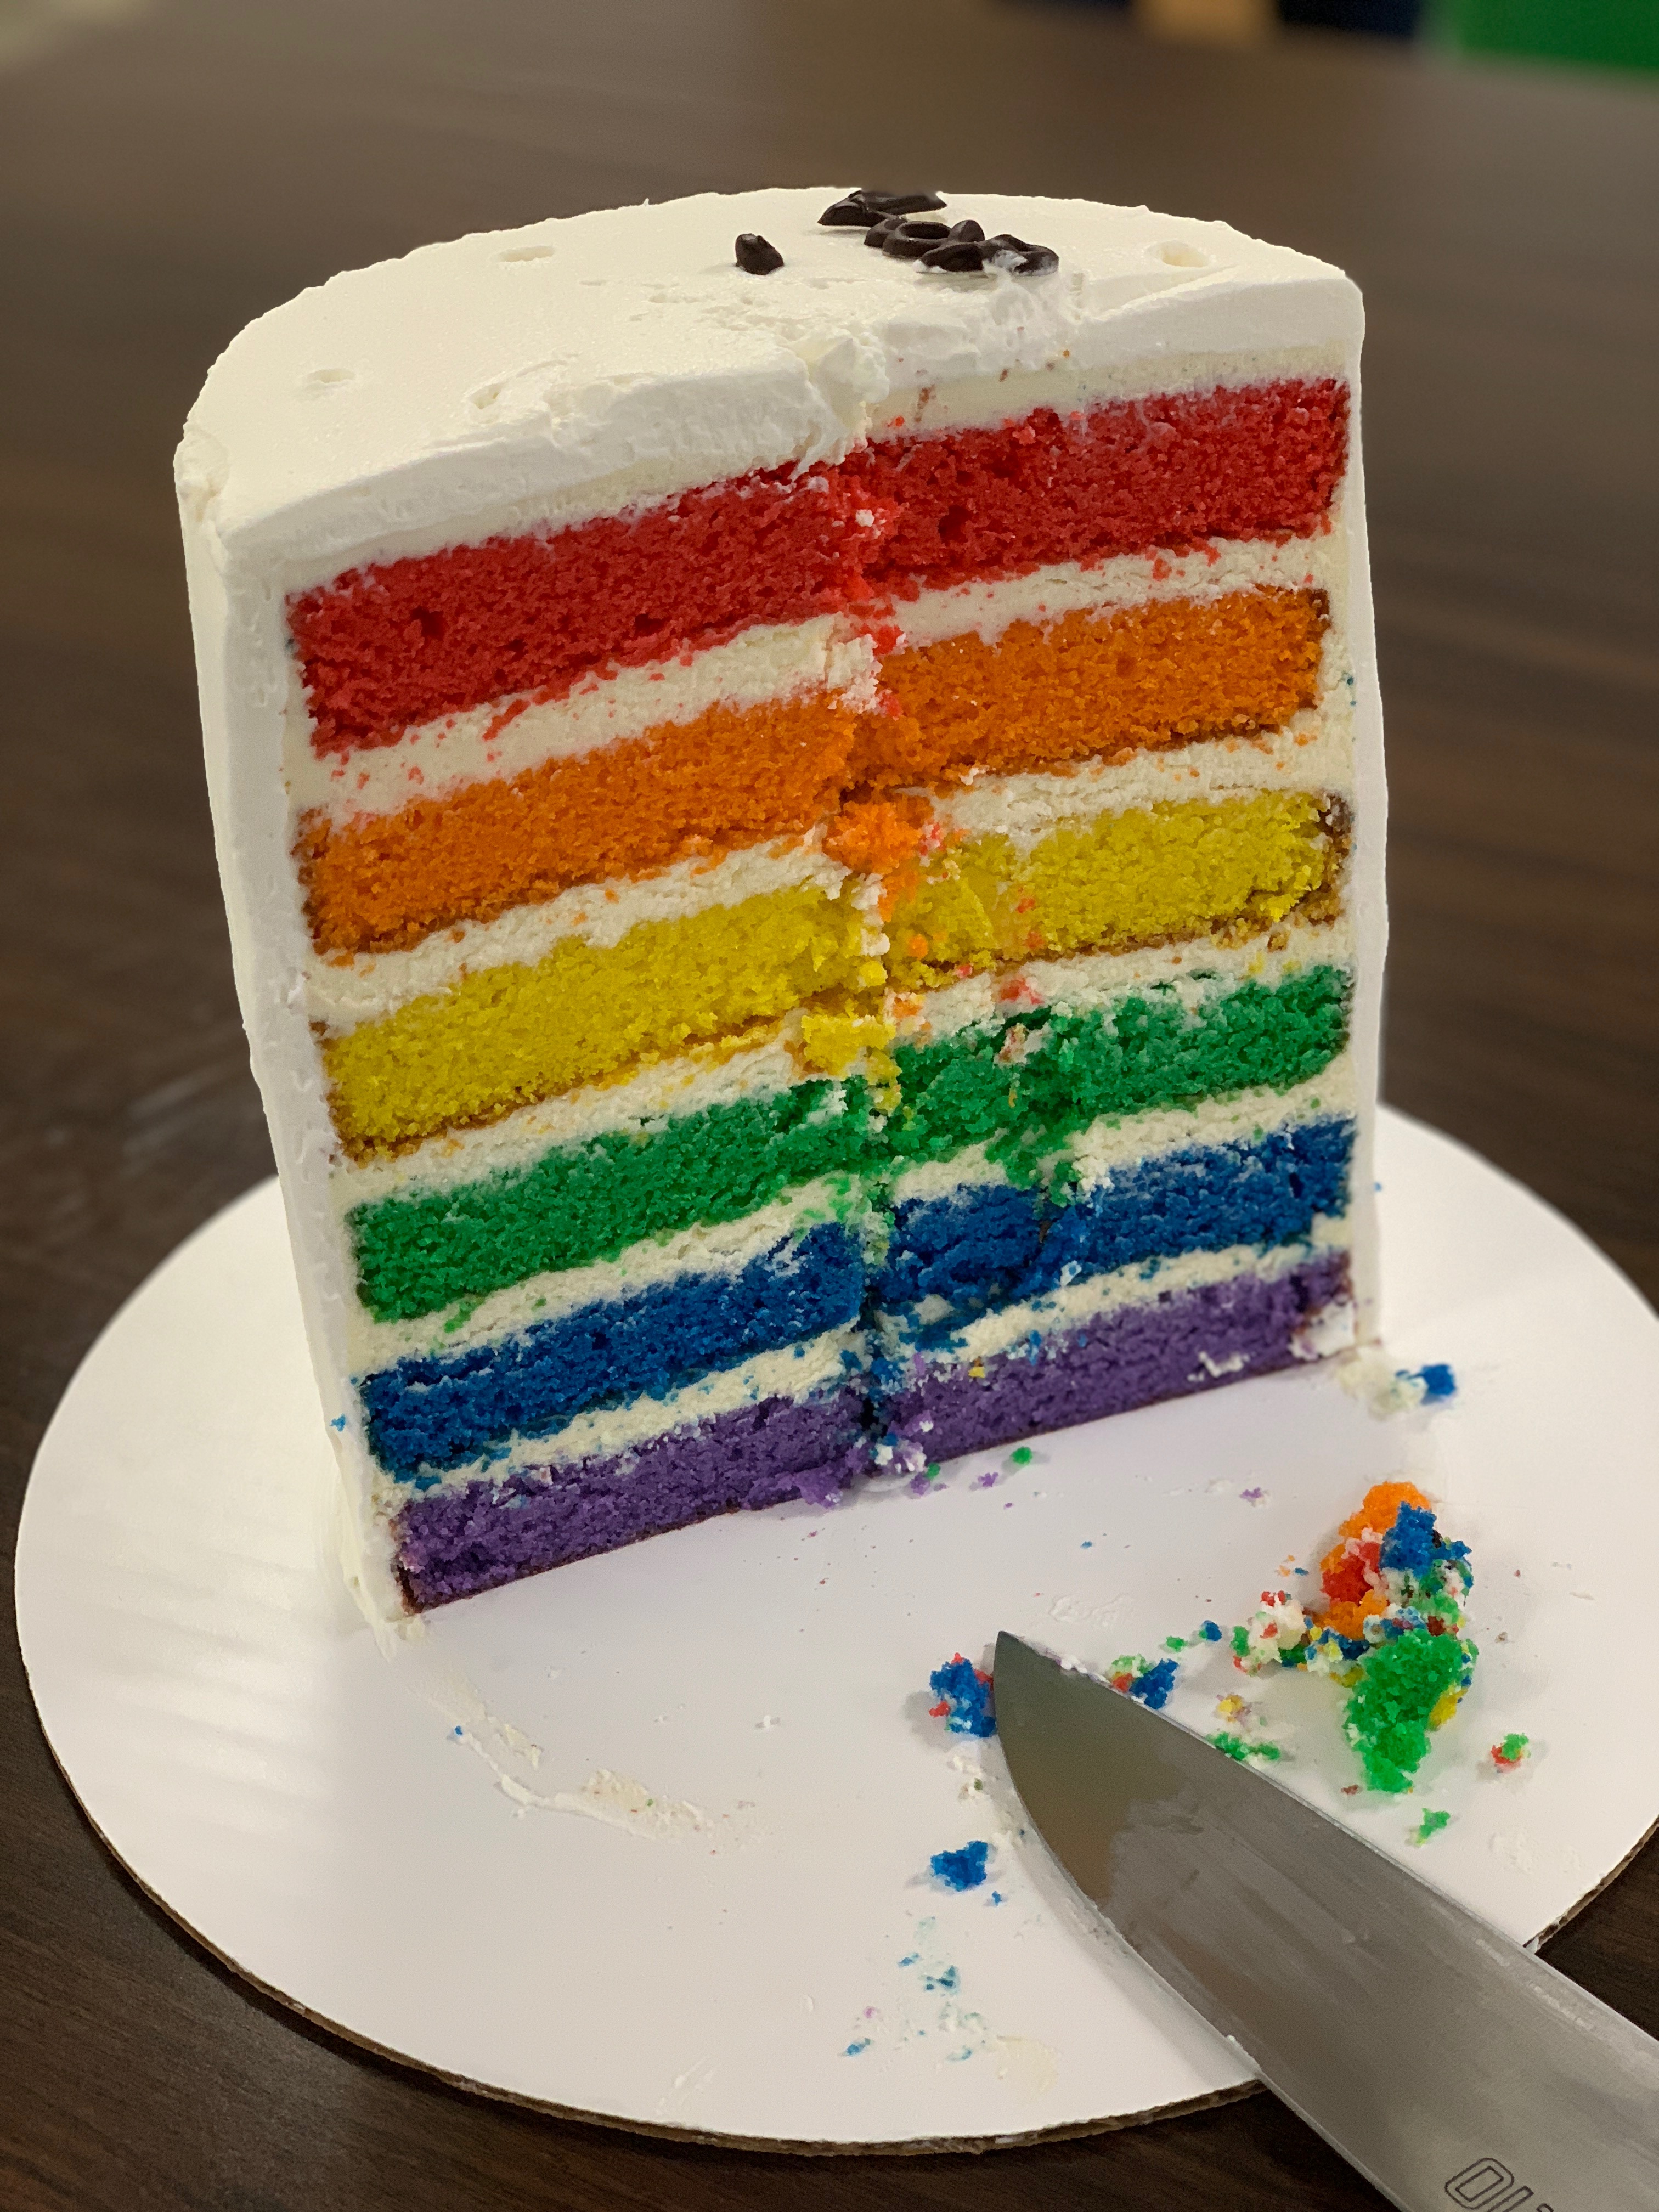
- Put the bottom layer of almond sponge (purple for me) on a 10″ cardboard round, centered.
- Spread a little bit less than 1/5 of your buttercream (about 250g) evenly across the sponge. Be sure to fully cover the sponge; a little bit of buttercream going over the edge is fine as it will just be used to frost the sides.
- Put the next layer of sponge (blue) and alternate steps 2 and 3 (green, yellow, orange, red, in order) until all the sponges are used up and most of the buttercream is gone. Don’t be afraid to adjust the layers to make sure they’re perfectly aligned on top of one another.
- A cake decorating turn table and an offset spatula makes this work easier but if you don’t have a turntable you can just take a little bit of extra time.
- Use the remaining buttercream and any that has overflowed the sponge layers to frost the sides. It doesn’t need to be fully frosted, just smooth out and large holes you see.
- After step 4 you can alternatively chill the cake in the refrigerator for a little while to stiffen the buttercream and make frosting slightly easier. Not necessary but if you have time and space in the refrigerator it slows down the pace of this bake to a more chillaxed level.
- Use the frosting to frost the top and sides of the cake as smooth and level as possible. The cake should be stark white and minimalist.
- If you want slightly more decoration outside without too much additional work, quickly blitz some cake scraps left over from leveling to get a rainbow crumb. You can also crumb by hand if you’re patient but a small food processor makes quick work of it. Be careful not to over-process as the color will get darker and darker as the crumbs become smaller. Mix the crumbs into the frosting for rainbow bits.
Optimization and Pessimization
Optimization
There’s not a lot of optimization possible in this cake, unfortunately, since most home bakers are not going to have six(6) 8(eight)inch(“) pans(pans). The best places to save time are to use the 25 minute baking and 10 minute cooling time from the first batch of sponges to make frosting, butter cream, and the batter and coloring for the second set of cakes. You have to be careful here as forgotten buttercream tends to accrue entropy much faster than you’d expect, ditto for unwatched cake batter.
Pessimization
If you only have two pans, you will have to use 2/3 of the cake recipe for each batch. This can be done with some careful arithmetic and just putting all 10 eggs together, beat, and then take 1/3 by weight.
Attempting this with a single pans is possible but the quality will suffer as will your mental health. You will want to make a batch of batter, color 1/3 of it, bake it, and keep the rest of the batter in the refrigerator as long as possible. It will also take you FIVE EVER. I do not recommend this #selfcare.
You can substitute a electric hand mixer for a stand mixer but a stand mixer is faster and frees up a hand. Also the trick of warming up the butter quickly while whipping it will not work with a hand mixer.
If you don’t have an infrared thermometer I would recommend you get one! If you don’t want to get one then the only temperature you have to watch out for is in the butter cream. Try to make sure the whipped butter is at cool room temperature and the chilled creme patissiere at the same temperature. Having both be a bit too cool and then just whipping it until it comes up to temperature is safer than having things be too warm.